Showing posts with label Advanced Bread and Pastry. Show all posts

July 27, 2011

Laminated Brioche

Labels: , ,

Laminated Brioche
Laminated Brioche
laminated brioche swirls filled with chopped candied figs

I've been eyeing Laminated Brioche since I bought ADVANCED BREAD AND PASTRY by Michel Suas but have been apprehensive I might fail. I finally baked them yesterday, the whole process took 2 days starting early morning the first day and finished baking late afternoon the second day. It actually takes 3 days but I'm impatient and I started reeeaaally early in the morning to be able to finish the next day.

It was a semi success as you can see from the crumb. There are layers visible but the honeycomb-like layers that I was expecting are missing. I'll surely make them again until I perfect the laminating process for a better looking layered crumb. The rolls are good enough for me at this time as they are delicious and not too rich; the crust is super flaky and the crumb is light, airy, and buttery but not greasy. The recipe surprisingly does not have much butter, only a total of 10½ ounces to 16 ounces of bread flour. For the butter block I followed another method because it makes the butter more pliable than just pounding on the sticks to flatten them.

Tip: For doughs with higher sugar content it's best to use the appropriate instant yeast such as SAF Gold. The dough will rise better when you use this type of yeast.

Laminated Brioche
adapted from ADVANCED BREAD AND PASTRY by Michel Suas

sponge
3 ounces bread flour
1/8 teaspoon instant yeast
2 ounces water
  • Mix all ingredients until smooth. Place in a container, cover with plastic wrap, and leave on the kitchen counter for 12 hours.
final dough
13 ounces bread flour
5 whole eggs
¾ ounce water
2 ounces sugar
1½ teaspoons kosher salt
2¼ teaspoons SAF Gold instant yeast
2½ ounces butter, room temperature
sponge
  • Mix all ingredients in a standing mixer with dough hook attachment. Knead on medium high for 10 minutes. Transfer into a lightly buttered container, cover with plastic wrap and lid, and leave on the kitchen counter for 1 hour. Retard in the refrigerator overnight or for 15 hours.
butter block
8 ounces cold butter
1 tablespoon all-purpose flour
  • Cut butter into ½ inch slices and place in the bowl of a standing mixer. Sprinkle the flour and beat on low with the paddle attachment until combined, scraping down the sides as needed. The butter should still be cold. Transfer the butter mixture onto a large piece of plastic wrap and shape into a 6-inch square. Refrigerate until needed. 
laminated brioche
final dough
butter block
all-purpose flour
chopped candied figs, dried currants and sugar, or almond cream
1 beaten egg
  • Dust the surface lightly with flour. Remove the dough from refrigerator and roll into a 12 x 6-inch rectangle. Place the butter block in the middle and bring both sides to the middle covering the butter entirely. Lightly tap the dough with a rolling pin starting from the center out and roll into a 16 x 9-inch rectangle. Fold 1/3 of the dough over 2/3 of the dough and fold the rest over like a letter. Wrap in plastic wrap and refrigerate for 30 to 45 minutes. Repeat 3 more times, resting in the refrigerator each time.
  • Roll out the dough into 16-inch wide and 1/8 inch thin rectangle. Brush one edge with water, 1 inch wide. Sprinkle with currants and dust lightly with sugar; or spread a thin layer of almond cream, leaving the part brushed with water. Roll from the unwatered side and cut into 1 inch wide strips. Place on parchment-lined sheet pans, tucking the outer end of the strip underneath the center of the swirl. Brush top and sides of swirls with egg wash, lightly cover with plastic wrap and leave to proof for 1½ to 2 hours preferably in a humid place. Brush top and sides of swirls a second time and bake in a preheated 400°F oven for 15 minutes or until golden brown all over.

December 19, 2010

Kulinarya Cooking Club: Homemade Food Gifts

Labels: , , , ,

Pan de Leche
Pan de Leche
pan de leche


KCC

Kulinarya was started by a group of Filipino foodies living in Sydney (Kath, Trisha, and Trissa), who are passionate about the Filipino culture and its colorful cuisine.

Each month we will showcase a new dish along with their family recipes. By sharing these recipes, we hope you find the same passion and love for Filipino Food as we do.

The December KCC theme is Homemade Food Gifts and our hosts are Joy and Maribel. Thank you ladies.

The easiest and most convenient for me would be either baked goods or candies and desserts. I chose to bake pan de leche (milk bread) and filled half of the dough balls with yema made with caramelized condensed milk and egg yolks and the other half I topped with chopped macapuno preserves. I didn't like any of the recipes I found online and adapted the pain au lait (milk bread) from ADVANCED BREAD AND PASTRY by Michel Suas. They are basically the same milk bread but Michel Suas' recipe has less sugar and eggs and the dough requires an overnight refrigeration producing delicious, soft, milky, and not too sweet [even with the addition of 1 more tablespoon of sugar]. They are perfect little rolls in a gift box that I believe anyone would love for breakfast on Christmas morning.

Pain au Lait/Pan de Leche

adapted from ADVANCED BREAD AND PASTRY

14½ ounces bread flour
6½ ounces warm (90°F) milk
2 eggs, room temperature
1½ ounces sugar, less or more to taste
2 teaspoons kosher salt
1¼ teaspoons instant yeast
5 ounces butter, room temperature
egg wash, optional
  • In the bowl of a standing mixer with the dough hook attached, mix all the ingredients except egg wash on first speed for 5 minutes. Increase to second speed and mix for 8 minutes. Transfer dough into a container, cover with plastic wrap and leave on the kitchen counter for 1 hour. Refrigerate overnight.
  • Remove dough from refrigerator and scale into 1½ ounce pieces, shape into balls, cover lightly, and let rest for 15 minutes. Flatten each ball and fill with half a tablespoon of preferred filling. Gather the edges and pinch to close. Place each filled ball seam-side down on paper-lined cupcake pans . Cover with plastic wrap and let rise for 1 hour to 1½ hours. Bake in a preheated 350°F oven for 20 to 25 minutes or until tops of the rolls are golden brown. These are best eaten while still warm. Rewarm leftover rolls in a preheated 325°F oven for 5 to 8 minutes.

Pan de Leche
top: filled with yema
bottom: topped with macapuno

October 10, 2010

Chocolate Nougat

Labels: , ,

Chocolate Nougat

I've been busy studying reading the most comprehensive and engrossing non-fiction book I have ever owned, ADVANCED BREAD AND PASTRY by Michel Suas. I kid you not, browsing through the book feels like I'm a student reading a textbook and preparing for an exam because it's meant to teach. The book is divided into 4 categories and 22 chapters, 942 pages in all with additional 87 pages for conversions, baker's percentages, temperature conversions, glossary, references, formula index, and subject index.

These are the 4 categories:
Part 1: Introduction, 43 pages, a chapter on historical perspective and current opportunities on bread and pastry and a second chapter on food safety and sanitation in the bakery, which are all must-read.
Part 2: Bread, 251 pages
Part 3: Viennoisserie, 93 pages
Part 4: Pastry, 591 pages

At the start of each chapter are objectives and brief introduction or history and at the end of every chapter a summary, key terms, and review questions.
example:
Part 4, Chapter 18 Petit Fours and Confections
Objectives
After reading this chapter, you should be able to
  • define the classical categories of petit fours and the characteristics of the items.
  • describe the contemporary categories of petit fours and to be able to make a selection of them.
  • define the properties of saturated and super saturated sugar solutions and to be able to make them successfully.
  • make a selection of sugar confections including crystalline, noncrystalline, aerated, and jelly.
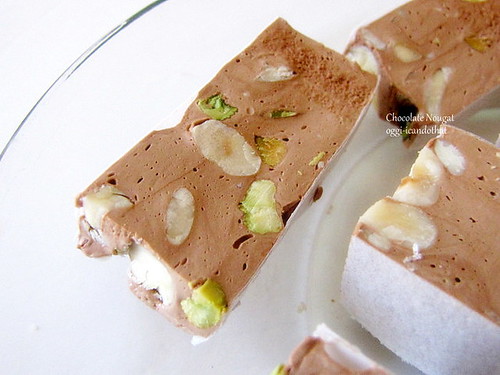
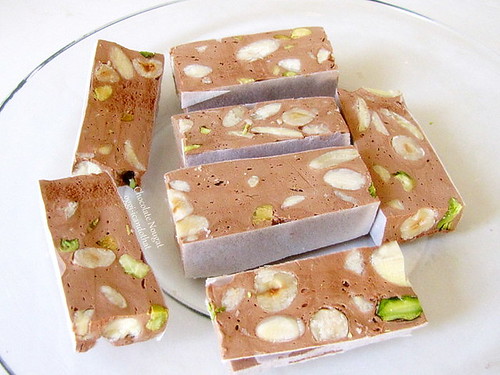
While I'm not a newcomer to candy making, I'm not an expert either and this book will probably make me one after I am finished reading it and if/when I'm done making all of the formulas which might take forever. The first I made from Part 4 Chapter 18 is Chocolate Nougat because I've never had chocolate nougat before. The chocolate in the recipe is called chocolate liquor which should not to be confused with chocolate liqueur. The glossary section defines it as "the product of the whole cocoa bean after it has gone through the initial production process and can be turned into cocoa powder and cocoa butter, can be sold as unsweetened chocolate, or can be further processed into dark or milk chocolate".

Glucose is available at candy/cake supply shops or you can get Wilton's but this brand is 3x more expensive. I used Ghirardelli 100% Cacao Unsweetened Baking bar. The candies came out perfect, not too hard nor too soft, have the right amount of sweetness and crunch from the nuts, and the chocolate flavor is rich without being overpowering. I love it!

Chocolate Nougat
adapted from ADVANCED BREAD AND PASTRY by Michel Suas
1 pound ½ ounce sugar
3¼ ounces glucose
5 ounces water
10 ounces honey
2 ounces egg whites
¾ ounce sugar
3½ ounces chocolate liquor
5½ ounces blanched hazelnuts
7 ounces blanched whole almonds
2½ ounces pistachios
2 sheets 8 x 11-inch rice or potato paper
  • Line the bottom of an 8 x 11-inch pan (or metal frame if you have one) with a sheet of rice paper.
  • Toast the hazelnuts and almonds in a 275°F oven until golden. Turn heat down to warm (100°F), add pistachios and keep them in the oven until needed.
  • In a medium heavy bottomed stainless steel pan, cook the first sugar, glucose, and water to 302°F. When the sugar mixture reaches 248°F, start cooking the honey (in a small stainless steel pan). Cook the honey to 266°F.
  • Using the whisk attachment, whip the egg whites with the ¾ ounce sugar. Slowly pour the honey onto the whipping egg white. Switch to the paddle attachment and add the hot sugar syrup.
  • When full volume is reached, add the melted chocolate and mix until blended. Add the warm nuts and mix until incorporated.
  • Transfer into the lined pan and smooth out if necessary with a buttered rubber scraper. Press the second paper on top of the nougat. Leave on the kitchen counter to set. When nougat has cooled, cut into desired sizes.

Chocolate Nougat


Chocolate Nougat


My next project from the book is Laminated Brioche. I can't wait to make and share them with my readers.:-)

September 27, 2010

Pain Meunier

Labels: , , , ,

Pain Meunier
Pain Meunier


Oh boy, I bought yet another baking book and I promise this would be the last, really...for the rest of the year. The book is called ADVANCED BREAD AND PASTRY A Professional Approach by Michel Suas. It's a big and heavy book with lots of beautiful photos and recipes for yeasted and quick breads, cakes, pastries, candies, fondants, and all sorts of confectionery. The book is definitely not for beginners but I recommend it to someone who is thinking of starting a baking business. Although I have been baking breads, cakes, and pastries for years now, it will take me many more to make them as professional looking as the ones in the book. Maybe I'll just read, learn a little, and admire the photos...or bake some of the yeasted breads that look and sound good. Like Pain Muenier or Miller's bread. This delicious and nutritious bread has all the components of the wheat kernel: bread flour, whole wheat flour, cracked wheat, and wheat germ. It's easy to make too, nothing too complicated or time consuming.

Pain Meunier history and a recipe that's almost identical to the book's is here.

Shaping Fendu
shaping fendu: make a thin 1½-inch indentation down the center of the batard, then fold one side into the center


Design by New WP Themes | Bloggerized by Lasantha - Premiumbloggertemplates.com